
For students using any version of MS Word beginning with Word '97 through the current version, whether on a Windows or Mac PC, it is strongly recommended that they download the "templates" from the class Web page or directly from Downloads.
The instructions below are intended for students using other wordprocessors. With some trial and error, they should be able to reproduce most of the features of the Word "templates" if they can translate the steps from Word to their wordprocessor.
1. Open a new Word document.2. In Word, find the dialog box for "AutoCorrect" (Under Options on the "Tools" menu in Word 2000) and unselect "Capitalize first letter of sentences" by clicking on the appropriate box until it is NOT checked.
3. In order to see spacing and carriage returns, make sure that the "Show Formatting" option is selected in your toolbar. It is activated in Word by a button containing an icon that looks like a paragraph symbol. See diagram from Word 2002 below:
4. Make sure the Font is set to "Times New Roman" in Windows and "Times" on a Mac. The Point Size (usually immediately to the right of the Font) should be set to 12 (see diagram above).5. From the File menu, click on "Page Setup."
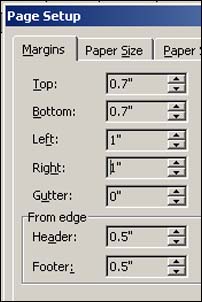
6. Change the left and right margins to 1 inch and the top and bottom margins to .7 inches, then click "OK" (see diagram below).
7. From the View menu, click on "Header and Footer."8. Type in a 4-line header as shown in the diagram below. Client: is flush with the left margin. Title: is near the center (we can adjust it later), and Page: is near the right margin. These headings should be highlighted with the mouse and formatted in bold face using the [B] button in the main Word tool bar. After Page: and a space, click on the [#] icon in the Header and Footer toolbar. Then type a space, the word "of" and another space. Finally click on the [++] icon in the Header and Footer toolbar. Add or remove spaces so that the second number just barely remains on the 1st line of the header.

9. On the second line of the header, type Writer: flush with the left margin. Using spaces, try to line up Run Time: with Title: in the 1st line. Then press ENTER and use the UNDERLINE key to type a line completely across the header. At the end of this line (line #3 of your header), press ENTER again to insert one more carriage return in the header.10. Close the Header and Footer toolbar.
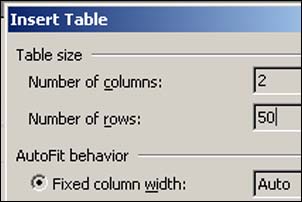
11. From the Table menu select "Insert" and "Table." In the dialog box that opens, select 2 columns and 50 rows. Then click on "OK" (see diagram below).
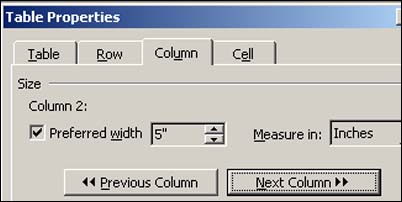
12. From the Table menu click on "Select" and "Table." Then click on the Center Text button in the main Word toolbar. This should center your table.13. With the table still selected (highlighted), click on the Table menu button again and select "Table Properties." From this dialog box, select the tab for "Columns." Set the width of Column #1 to 1.5 inches and Column #2 to 5 inches (see diagram below).
14. While you still have the "Table Properties" dialog box open, select the tab for "Table" and click on the "Borders and Shading" button at the bottom. Select the tab for "Borders" and click on "None." Then click on "OK" in the Borders and Shading box and again in the Table Properties box (see diagram below).

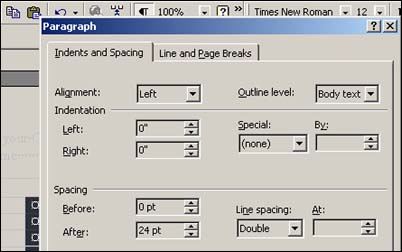
15. Click in the first cell of the right hand column (the 5 inch dialog column). Then from the Table menu click on "Select" and "Column." Then from the Format menu, select "Paragraph" and change the "Line Spacing" to Double and the "Space After" to 24 point. Then click on "OK" (see diagram below).
16. Using the File menu, select "Save As" and give your completed blank "template" an easily identified name such as "radio" (no quotes) and save it in a folder (directory) where you can find it easily. Word will supply the .doc suffix and other word processors will add their own.17. Now refer to Using Script Templates for MS Word to learn how to add specific header information and copy to your template.
1. Open a new Word document.2. In Word, find the dialog box for "AutoCorrect" (Under Options on the "Tools" menu in Word 2000) and unselect "Capitalize first letter of sentences" by clicking on the appropriate box until it is NOT checked.
3. In order to see spacing and carriage returns, make sure that the "Show Formatting" option is selected in your toolbar. It is activated in Word by a button containing an icon that looks like a paragraph symbol. See diagram from Word 2002 below:
4. Make sure the Font is set to "Times New Roman" in Windows and "Times" on a Mac. The Point Size (usually immediately to the right of the Font) should be set to 12 (see diagram above).5. From the File menu, click on "Page Setup."
6. Change the left and right margins to 1 inch and the top and bottom margins to .7 inches, then click "OK" (see diagram below).
7. From the View menu, click on "Header and Footer."8. Type in a 5-line header as shown in the diagram below. Client: is flush with the left margin. Title: is near the center (we can adjust it later), and Page: is near the right margin. These headings should be highlighted with the mouse and formatted in bold face using the [B] button in the main Word tool bar. After Page: and a space, click on the [#] icon in the Header and Footer toolbar. Then type a space, the word "of" and another space. Finally click on the [++] icon in the Header and Footer toolbar. Add or remove spaces so that the second number just barely remains on the 1st line of the header.
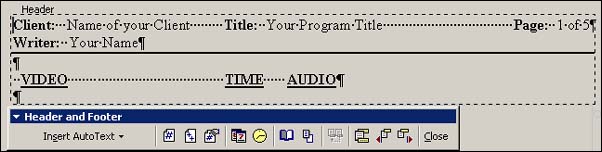
9. On the second line of the header, type Writer: flush with the left margin. Then press ENTER and use the UNDERLINE key to type a line completely across the header. At the end of this line (line #3 of your header), press ENTER again to insert one more carriage return in the header.10. Now type 2 spaces and type VIDEO. Use the space bar to place TIME approximately where it is in the diagram above, then space 6 more times and type AUDIO. Use the mouse to highlight each word and then format it as bold and underlined by using the [B] and [U] buttons on the main Word toolbar.
11. Close the Header and Footer toolbar.
12. From the Table menu select "Insert" and "Table." In the dialog box that opens, select 3 columns and 50 rows. Then click on "OK."
13. From the Table menu click on "Select" and "Table." Then click on the Center Text button in the main Word toolbar. This should center your table.
14. With the table still selected (highlighted), click on the Table menu button again and select "Table Properties." From this dialog box, select the tab for "Columns." Set the width of Column #1 to 2.2 inches, Column #2 to .8 inches and Column #3 to 3.5 inches.
15. While you still have the "Table Properties" dialog box open, select the tab for "Table" and click on the "Borders and Shading" button at the bottom. Select the tab for "Borders" and click on "None." Then click on "OK" in the Borders and Shading box and again in the Table Properties box (see diagram below).
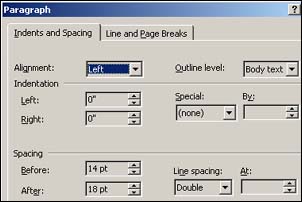
16. At this time you may want to select "Headers and Footers" from the View menu again and adjust the spacing on the TIME heading so it is centered over the middle column. It makes a more attractive header if you then adjust the Title: heading in line #1 to line up with the TIME heading. When you are satisfied, close the "Headers and Footers" toolbar.17. Click in the first cell of the right hand column (the Audio column). Then from the Table menu click on "Select" and "Column." Then from the Format menu, select "Paragraph" and change the "Line Spacing" to Double, the "Space Before" to 14 point and the "Space After" to 18 point. Then click on "OK" (see diagram below). This will leave a single line blank (for numbering shots in the VIDEO column) and will double space all audio copy.
18. Using the File menu, select "Save As" and give your completed blank "template" an easily identified name such as "radio" (no quotes) and save it in a folder (directory) where you can find it easily. Word will supply the .doc suffix and other word processors will add their own.19. Now refer to Using Script Templates for MS Word to learn how to add specific header information and copy to your template. While the template available for downloading has each shot (row) automatically numbered, this feature is only available on Word 2002 and will probably not translate into any other wordprocessor. So insert the appropriate shot number on the first line of the VIDEO column and then press ENTER to begin your video shot description in line with the first line of the audio copy.
The Real-Time Video Template is constructed exactly like the Single-Camera template, except for step #17. Substitute the following:
17a. Click in the first cell of the right hand column (the Audio column). Then from the Table menu click on "Select" and "Column." Then from the Format menu, select "Paragraph" and change the "Line Spacing" to Double and the "Space After" to 24 point. Then click on "OK" (see diagram below). This will leave a single line blank (for numbering shots in the VIDEO column) and will double space all audio copy.
1. Open a new Word document.2. In Word, find the dialog box for "AutoCorrect" (Under Options on the "Tools" menu in Word 2000) and unselect "Capitalize first letter of sentences" by clicking on the appropriate box until it is NOT checked.
3. In order to see spacing and carriage returns, make sure that the "Show Formatting" option is selected in your toolbar. It is activated in Word by a button containing an icon that looks like a paragraph symbol. See diagram from Word 2002 below:
4. Make sure the Font is set to "Times New Roman" in Windows and "Times" on a Mac. The Point Size (usually immediately to the right of the Font) should be set to 12 (see diagram above).5. From the File menu, click on "Page Setup."
6. Change the left and right margins to 1 inch and the top and bottom margins to .7 inches, then click "OK" (see diagram below).
7. From the View menu, click on "Header and Footer."8. Type in a 2-line header as shown in the diagram below. Title: is flush with the left margin and Page: is near the right margin. These headings should be highlighted with the mouse and formatted in bold face using the [B] button in the main Word tool bar. After Page: and a space, click on the [#] icon in the Header and Footer toolbar. Then type a space, the word "of" and another space. Finally click on the [++] icon in the Header and Footer toolbar. Add or remove spaces so that the second number just barely remains on the 1st line of the header.
 "
"
9. Press ENTER at the end of line #1 of your header and use the UNDERLINE key to type a line completely across the header. At the end of this line (line #2 of your header), you should have a spare carriage return symbol below the line.10. Close the Header and Footer toolbar.
11. From the Edit menu, click on "Select All". Then from the Format menu, click on "Tabs" and set tabs at .25 inches and 1.25 inches. Click "OK" when you are done (see diagram below).
 "
"
12. Using the File menu, select "Save As" and give your completed blank "template" an easily identified name such as "radio" (no quotes) and save it in a folder (directory) where you can find it easily. Word will supply the .doc suffix and other word processors will add their own.13. Now refer to Using Script Templates for MS Word to learn how to add specific header information and copy to your template.
