Using the Chyron Lyric Off-Line
Lyric interface
Interface
Chyron Lyric is a Windows program and follows many of the conventions Windows users are familiar with. While it can perform special functions reflected in its dedicated keyboard and communication with the Kayak switcher, creating pages (messages) may be done on a stand-alone computer. We have set up a Lenovo mini-tower computer with a large display in G-31. The Lyric software on this computer is configured for 16:9 images and is the preferred location for creating TVR 055 CG pages.
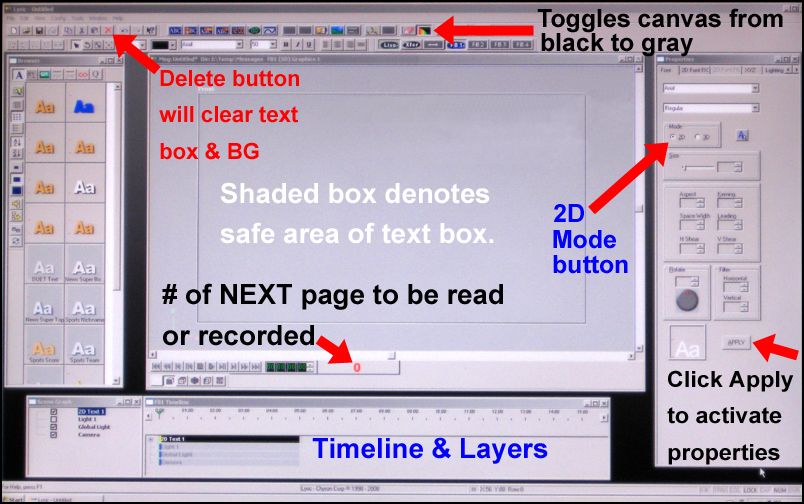
The top of the screen contains two rows of menu and tool buttons, some of which will be discussed in this guide.
The left side of the screen contains the Browser, a powerful library of often-used fonts and graphics for regularly repeating programs. It is of very limited use for one-off programs like TVR 055 final projects, so it will not be covered in this guide.
The center of the screen contains a large Preview screen (canvas) with a title safe area denoted by a box. This is where pages (Chyron calls them "messages" but most operators refer to them as "pages") are built and displayed for the operator. The narrow band at the top of the window displays the "message" number of the page being viewed, while a larger, red number at the bottom of the window denotes the number of the NEXT page in cue, ready to be read or recorded.
The right side of the screen displays the Properties control panel. It is somewhat contextual, so if you are typing text in the Preview window, it usually displays controls relating to text, such as font, size, edge, etc. There are tabs at the top to select whatever aspect of the graphic you want to control. Note that changes made in the Properties control panel are not displayed in the Preview window until the APPLY button at the bottom, right is clicked.
The bottom of the screen displays the Screen Graph, a timeline for animations and a list of layers. The operator may bring layers forward or send them backward by using this section to select and drag layers up or down the list. This is a powerful and convenient tool for manipulating the elements of complex graphics.
Starting Up
To insure that each student's Chyron pages are protected, they should be recorded on a USB flash drive (the same drive can be used for prompter copy). The following steps will set up the Chyron to read and write using your USB drive.
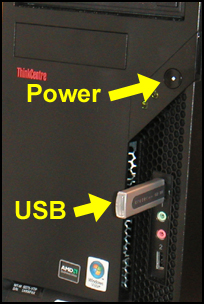
1. Turn on the CG by pressing the power button on the front of the Lenovo tower.
2. Once the monitor displays a log-in screen with the username "TVStudent," fill in the password: lenovoG31 EXACTLY as shown (with the G in caps). Then click on OK.
3. After the computer boots to Windows, plug your USB flash drive into the socket located on the front of the Lenovo tower.
4. Depending on the brand of your USB drive, the Windows file transfer window may display over the screen. If this happens, click on Cancel at the bottom of this window.
5. Once your USB drive is installed, use the mouse to double click on the Lyric 6.5 icon.
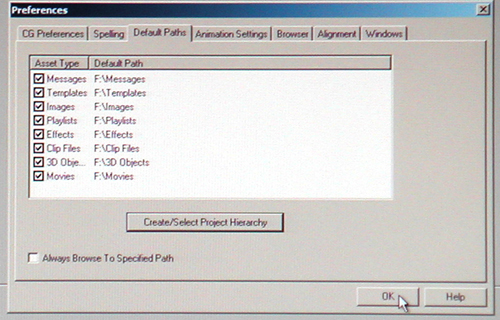
6. Once the program interface is displayed, click on the Config menu and then on Preferences.
7. Click on the Default Paths tab and then on the Create/Select Project Hierarchy button at the bottom of the window.
8. Navigate to your USB drive (usually drive F:) and a specific directory, if desired. The first time you do this, the Lyric will ask to create 8 folders. Click on OK for each of these folders. When reloading this drive, just select the path and you will not have to rebuild the folders. Using the USB drive as your root directory, the Default Paths window should look something like the image below.
Recording and Reading Pages with the Lyric Off-Line Software
In general the operator reads pages sequencially using the READ key.
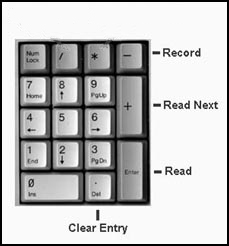
The shortcut keys for operating the Lyric in off-line mode are located on the numeric keypad on the right-hand side of the keyboard. NOTE: These keys are dedicated to command functions. Type numbers to be used in text on the number keys across the top of the keyboard.
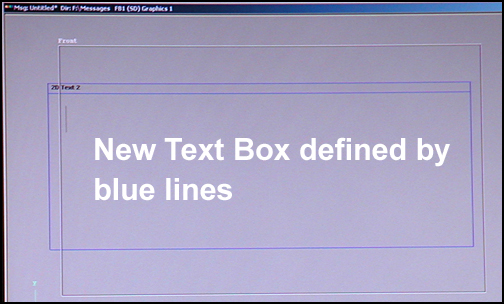
- Lyric automatically opens to a blank text page which covers the entire Preview window.
- The gray box within the Preview window is the Safe Title Area.
- Text and graphics are composed using a layered system.
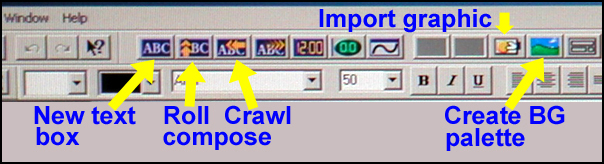
- If text or graphics are not intended to fill the entire screen, delete the default text box using the Clear Screen button (red X) in the top tool bar.
- Then create a new text box with the appropriate tool button (ABC) and resize the box using the included handles.
- In order to create text to be rolled or crawled, the Roll Compose or Crawl Compose button must be clicked BEFORE the text is created.
1. Left click within the safe area box where you want the text to start. If you want more control over where to positon text, then next click on the red X button to clear the full screen text box and create a new box using the ABC button. This box will have a blue boundary and title band at the top. It can be resized by grabbing the sides with the mouse and dragging. It can be repositioned by grabbing the title band and dragging.
2. Select a font, size, style, character color and edge color from the familiar Windows font control toolbar at the top of the screen. You can later use this same tool bar to justify or center the text you have typed.

3. Click on the 2D Font FX tab in the Properties panel to modify the font and its edge or shadow. Make sure that "Edge, None" is clicked under Components at the top of the Properties panel. It will change to reflect the type of edge you apply.
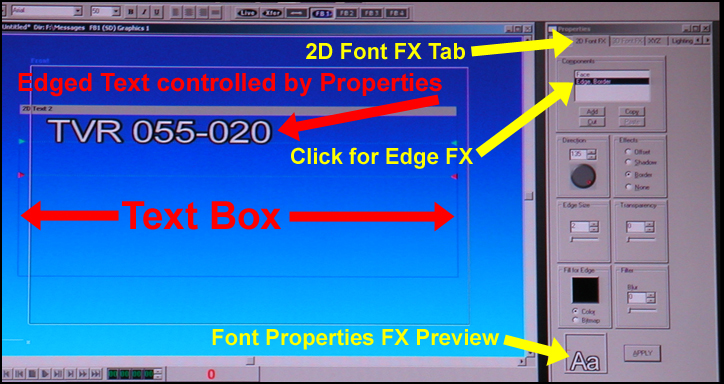
4. To alter the font (type face and size) or to add an edge or shadow to text you have already typed, you must first select the text to be affected. CTRL A will select all text within the box, which is usually what you want. Selecting text is not necessary to set font and edge attributes if you have not started typing text.
5. Type the message.
6. Position your text on the page. At the top of the screen are Page Justification buttons to left or right justify text, center it left to right, or center it in the middle of the page. These buttons affect all selected text, so use CTRL A if it is not already selected to position all text on the page. Each line will have a tiny triangle at the margin. Grabbing this triangle allows you to move an individual line up or down.
If you created new text boxes, you can move all of the text in a box by grabbing the box's title band and dragging it to the desired position.
Saving a Page
1. Make sure the USB drive has been designated the default path.
2. Make sure that 2D is selected in the Mode box of the Properties window. Sometimes 3D gets selected and our Lyric does not have a 3D module, so this can lead to an error message on playback.
3. Enter the page number desired on the numeric keypad and press the MINUS (Record) key on the numeric key pad. If the page number you entered already has a message recorded on it, you will get a dialog box asking if you want to overwrite it. Be CAREFUL! Since the default is "Yes," pressing ENTER will erase whatever was recorded under that page number on the drive.
Creating Backgrounds
For much of the CG text you create you want a transparent background so that it can be keyed over other images. This is the default for the Lyric and anything that is Windows gray will be transparent. If you want to take a CG page directly, you can create backgrounds on the CG, or you can import them from digital photos or graphics created in Photoshop or similar programs.
To create a color background on the Lyric:
1. Click the Create Background Palette button.
2. A color palette opens and you can experiment with various color combinations, pressing APPLY to see your results in the Preview screen. You may want to avoid a solid background of pure (RGB) blue, as this is the color of the edges of text boxes and you will not be able to see them over this background.
3. Click on the Add text box button (ABC) and type text to be displayed over the image. You can drag this text box around and resize as necessary to line up your text with the background.
4. Record to your USB drive as a regular message (page) as detailed above.

To use a photo or graphic as a background for the entire screen:
1. Create or edit it to be 720 pixels wide by 486 pixels high and save it to your USB drive as a JPEG or TIF image file (TIF retains transparency information, which is helpful for complex graphics).
2. Click the Import Graphic button in the top tool bar and navigate to the file you want to import.
3. If you already have text on the Preview screen, you will get a dialog box asking if you want to "Embed image in 2D text 1." It will further tell you to "Select NO to add to scene." Click on NO unless you only want the graphic behind the text.
4. Record to your USB drive as a regular message (page) as detailed above.
Clearing the Preview Screen
1. Once you have recorded a page, you need to clear the Preview Screen to begin building another page. If all you have is text, or if your text and background are a single layer, the Delete button (Red X) will generally clear the screen and leave it completely blank (no text box). You will then need to use the New Text button (ABC) to create a blank text box.
2. If you have built a very complex graphic page, the Delete button may not completely erase it. In that case, select each object individually and use the Delete Object selection under the Edit menu.
Reading Pages from the Disk
1. To read an individual page, type the page number on the numeric keypad, then press ENTER (Read). This reads the page to memory to display it on the PC screen.
2. To read sequential pages, just keep pressing the READ key. Be careful not to hold the key down too long or you will skip over pages. NOTE that the message (page) number shown below the Preview screen always shows the number of the NEXT page available on the disk, and NOT the one you are viewing!
Shutting Down
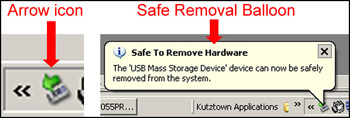
It is CRITICALLY IMPORTANT that you close Lyric and Windows correctly BEFORE you power down the system at the CPU.
First be sure to EJECT your drive from the computer by clicking on the tiny green arrow in the lower right corner of the screen and wait for the baloon that says it is safe to remove hardware as shown in the image below: